
If you are developing software and have multiple PCs, isn't it troublesome that the development environment is different for each PC, or frustrating that it takes time to start up the development environment after turning off the power?
I am one of them.
So this time, I will explain how to unify the remote development environment using VS Code's Remote Development and VPS.
Recommended for people like this
- Those who have multiple PCs and want to unify the development environment
- Those who find it troublesome to start up the entire development environment every time they turn off the PC
There are four things to do.
- Rent a VPS
- Check VPS settings
- Prepare an environment to connect to VPS using VS Code's Remote Development
- Just write programs on VPS
I will explain each step above.
Let's Rent a VPS. About 1,500 yen per month, 50 yen per day
In order to unify the remote development environment, it is necessary to place a server where it can be connected from the Internet.
As one of the means for that, it is the custom to rent a VPS (virtual server with root privileges) and set up a development environment there.
There are many VPS providers, but I recommend ConoHa VPS.
It boasts such popularity that there is no engineer who does not know it, and it is operated by GMO Internet, a listed company.
We are currently running a campaign where you can get up to 1 month free limited to those who click the banner below. Please subscribe to ConoHa VPS.
After registration is complete, log in and follow the steps below.
Configure VPS
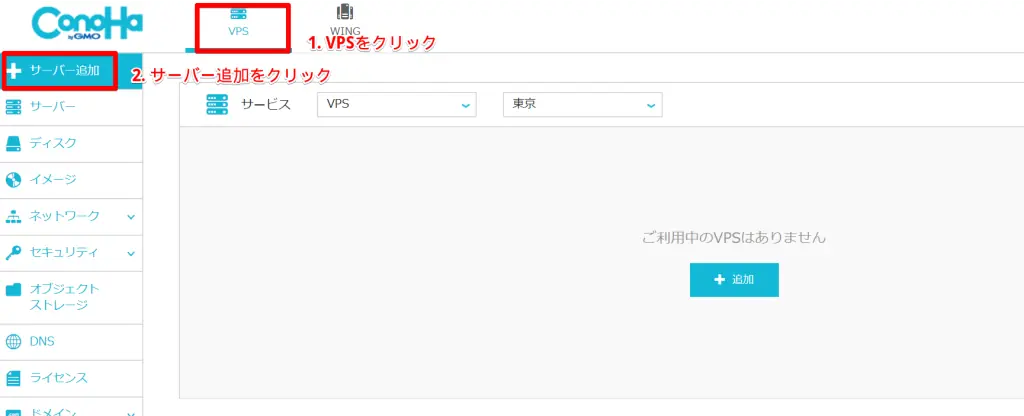
First, click VPS and click Add Server.
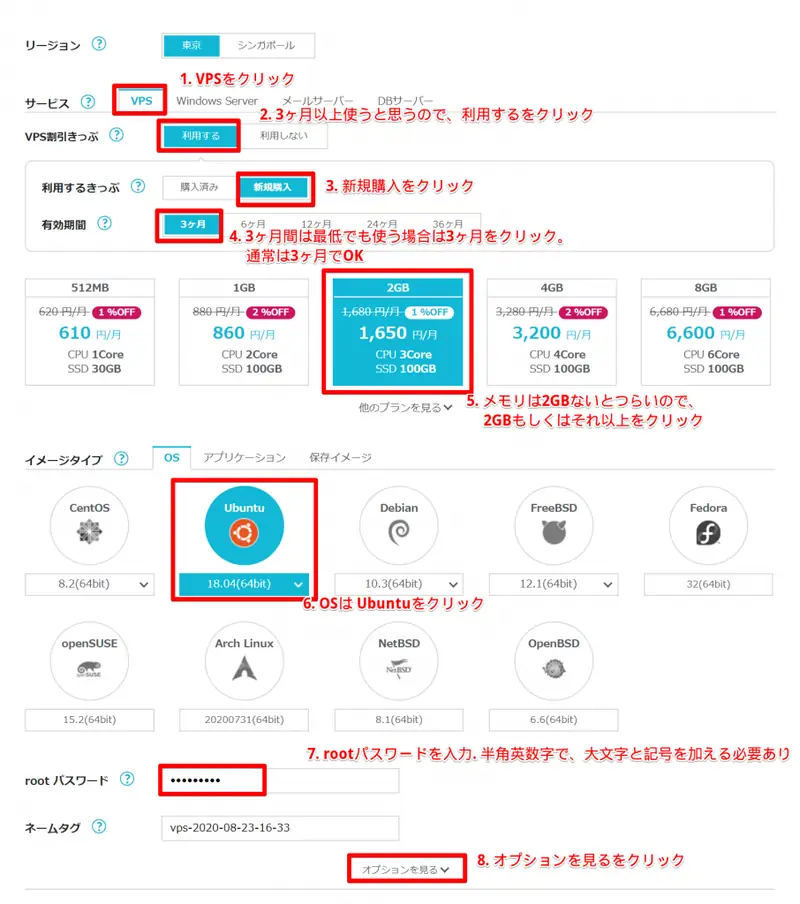
Next, click the "VPS" tab at the top of the screen.
VPS can be rented on an hourly basis, but since we want to unify the remote development environment this time, we should use it for at least 3 months, so
select "Use" for VPS discount ticket.
For the expiration date, select 3 months for now.
The server needs at least 2GB of memory, so I'm choosing 2GB here, but more is fine.
For OS, select the standard Ubuntu 18.04 (64bit).
Enter the root password automatically set for the VPS server. Note that you need to include single-byte alphanumeric characters, uppercase letters, and symbols.
Once entered up to here, click View Options and perform detailed settings.
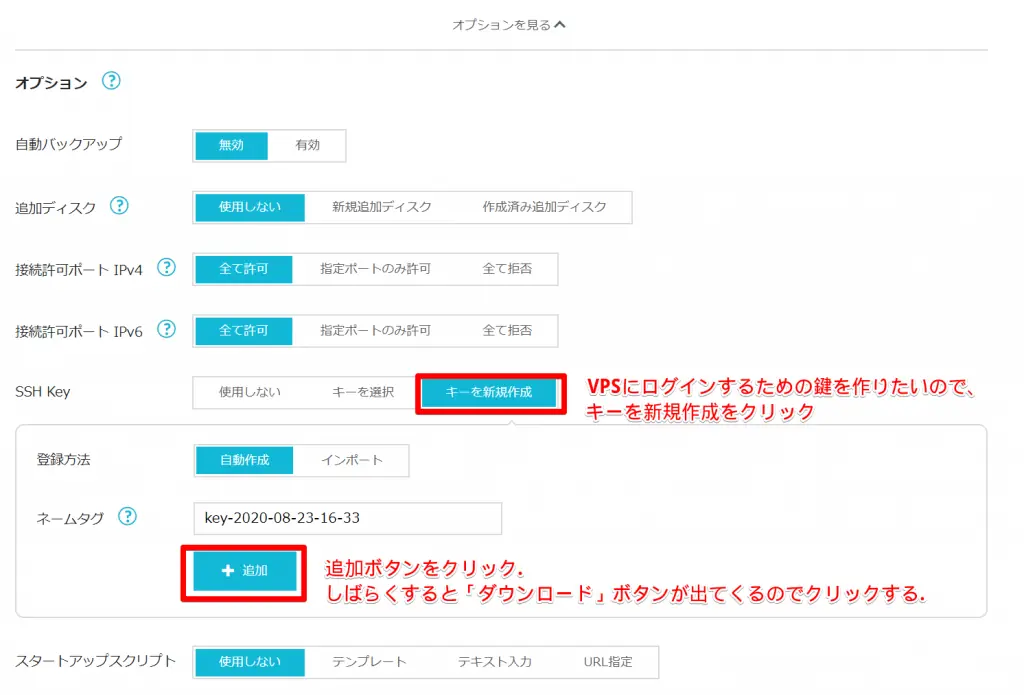
In ConoHa VPS, public key authentication can be used as a method to connect to VPS via SSH.
Therefore, it is necessary to create a key here.
Click "Create New Key" and press the Add button to create a key.
The created key can be downloaded from the "Download" button, so be sure to download it.
Since this key is necessary to log in to the VPS, attach it to yourself via Gmail etc. and back it up.
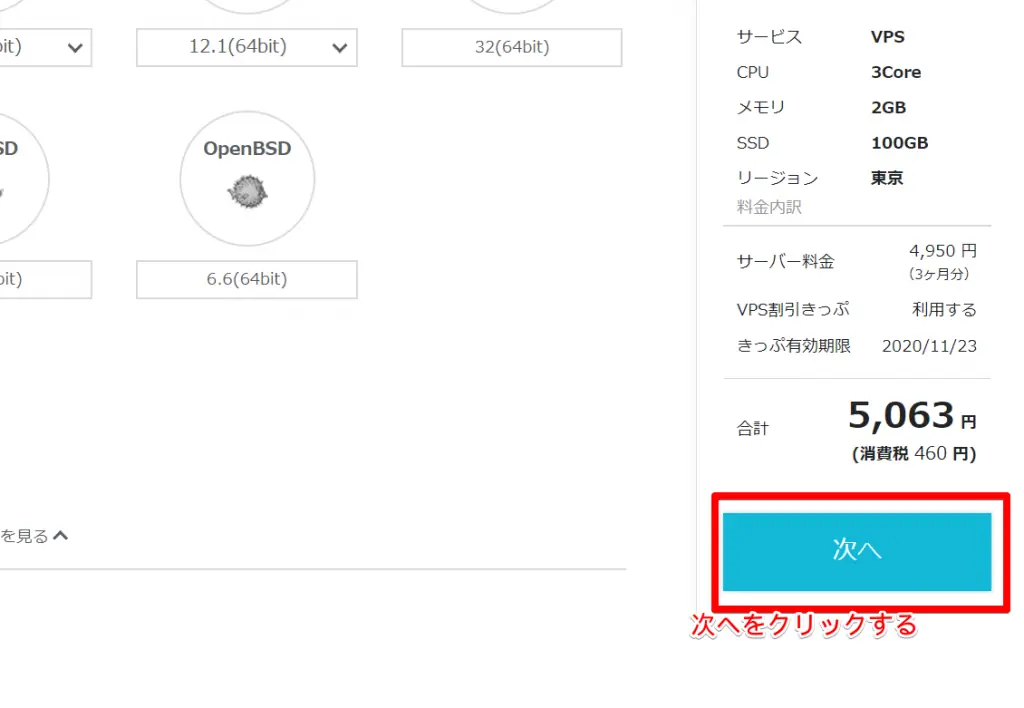
Press the "Next" button to proceed to the payment screen.
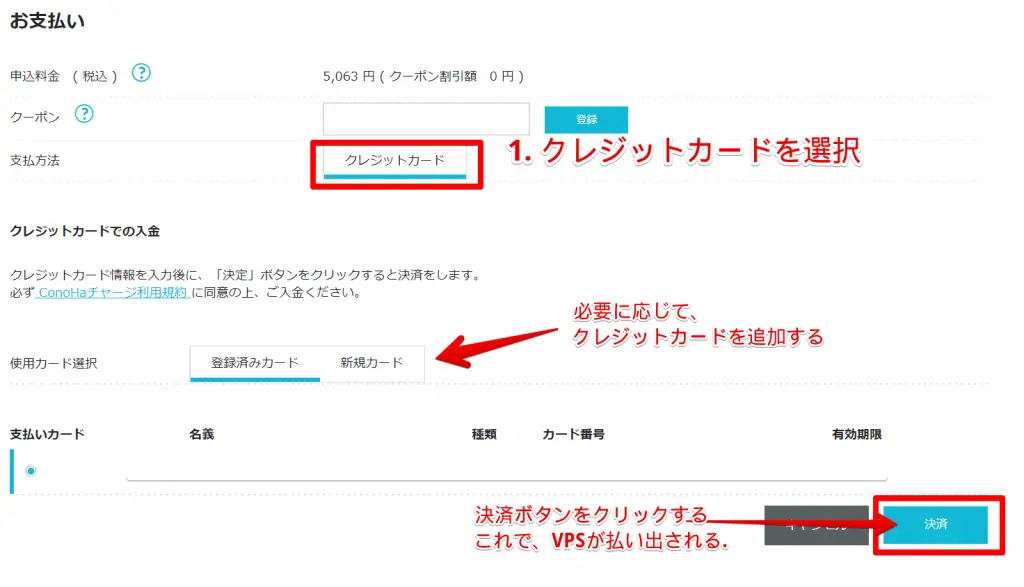
Select a payment method.
Select credit card, and if necessary, add a credit card from "New Card",
then press the "Pay" button at the bottom right of the screen to issue the VPS.
Check VPS Settings (Note down IP address)
Since the VPS has been issued in the above procedure, next check the IP address of the VPS.
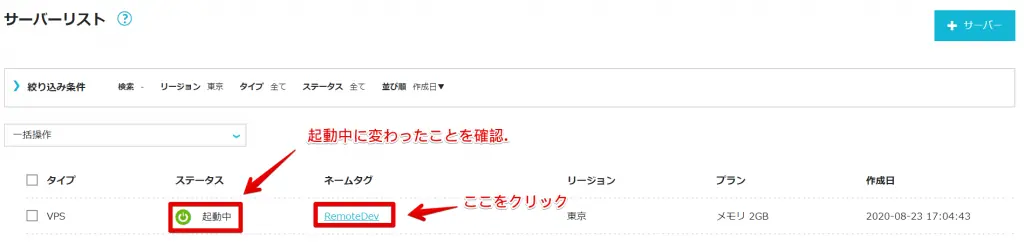
First, wait until the status becomes "Running".
Once it is running, click the link in the name tag.
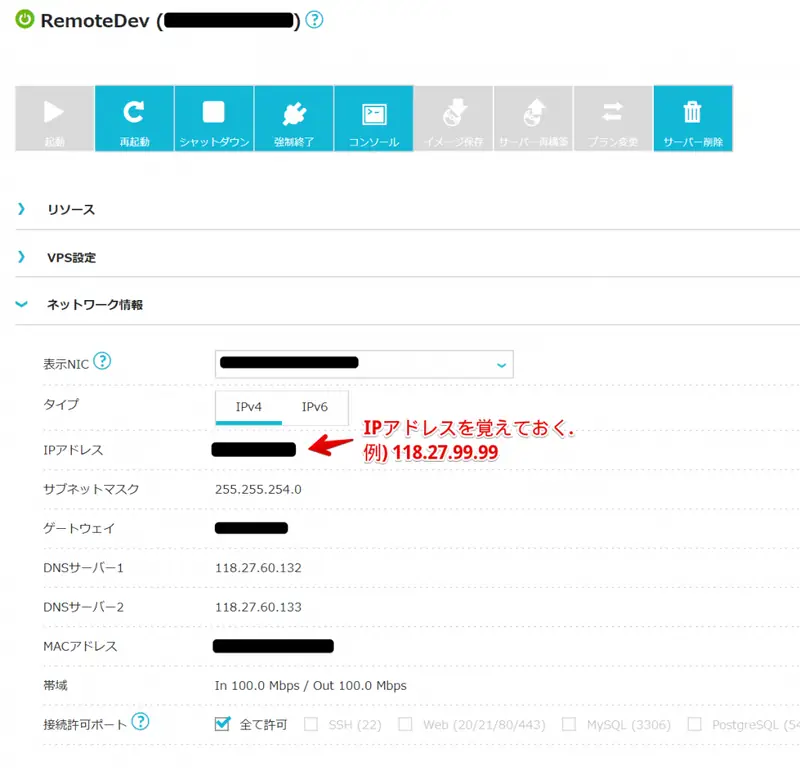
Clicking it allows you to check the VPS settings.
This time, let's note down the IP address, which corresponds to the address for connecting to the VPS.
In the figure above, it is masked because it is private information such as an address, but it will be a value like 118.27.99.99.
Prepare an environment to connect to VPS using VS Code's Remote Development
First, download VS Code.
Click the link below to download.
Download Visual Studio Code - Mac, Linux, Windows
Once downloaded, launch VS Code.
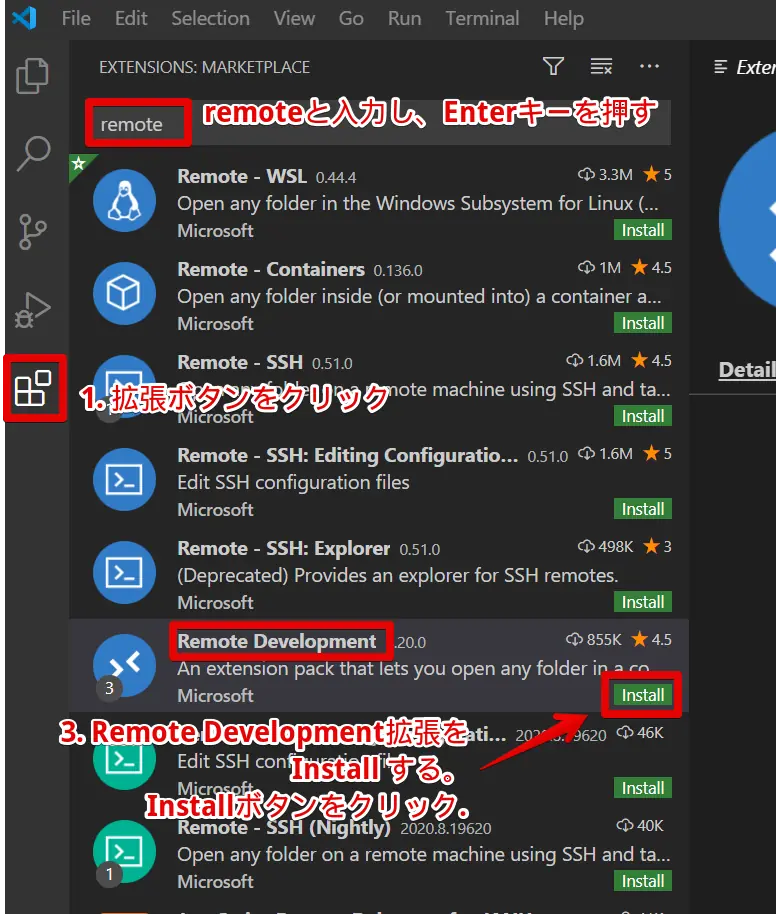
Once launched, click the extensions button,
type remote in the search box and Enter
There is a plugin called Remote Development, so click the Install button.
This installs Remote Development for VS Code.
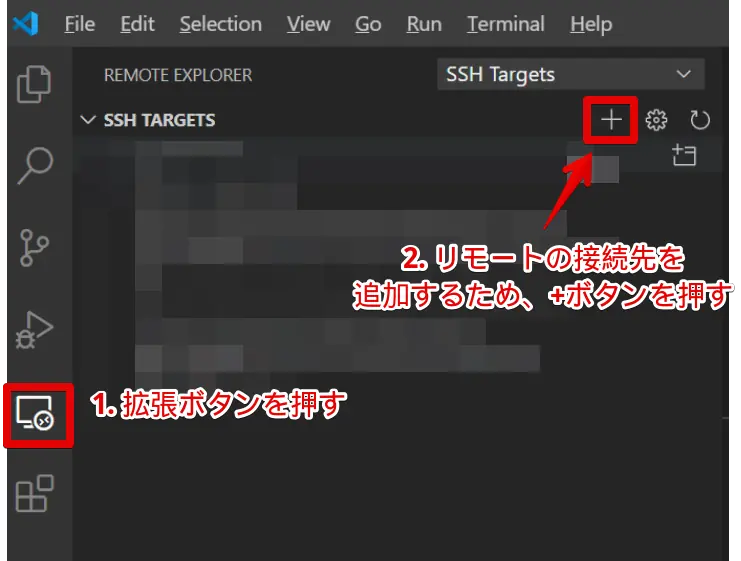
Since it is necessary to inform VS Code of the VPS which is the remote connection destination,
first click the extensions button -> click the + icon.
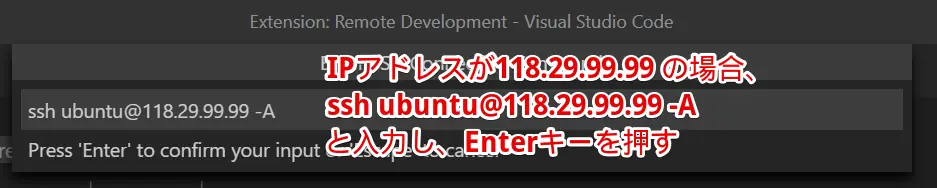
If the VPS address is 118.28.99.99,
type ssh [email protected] -A
and Enter
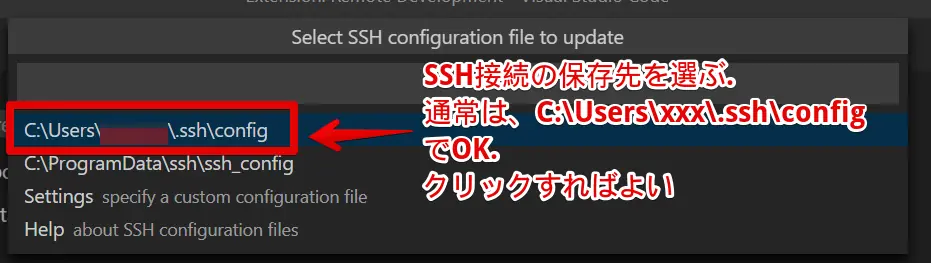
Specify the save destination of the connection destination. Usually it is C:\Users\Username\.ssh\config (for Windows).
Basically, just click the one displayed at the top.
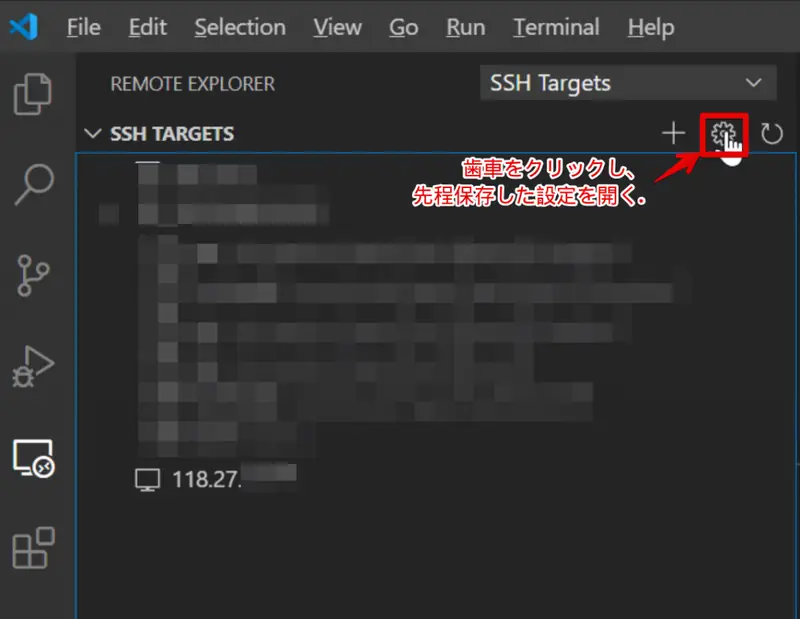
Since we want to set the details of the connection destination set earlier, click the gear icon.
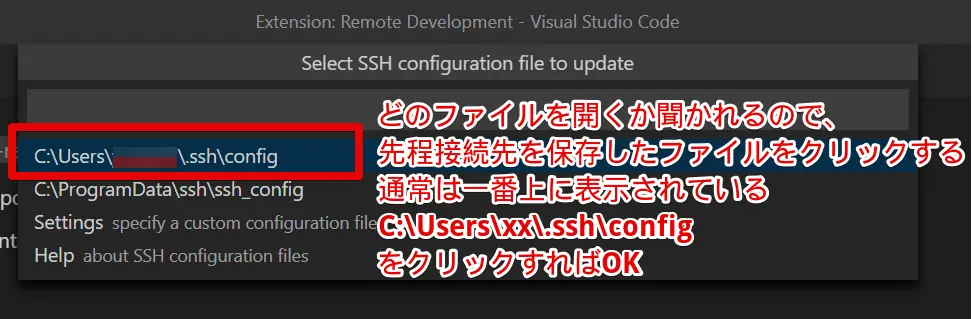
You will be asked which file to open, so click the file where you saved the connection destination earlier.
Usually, clicking the one displayed at the top is OK.
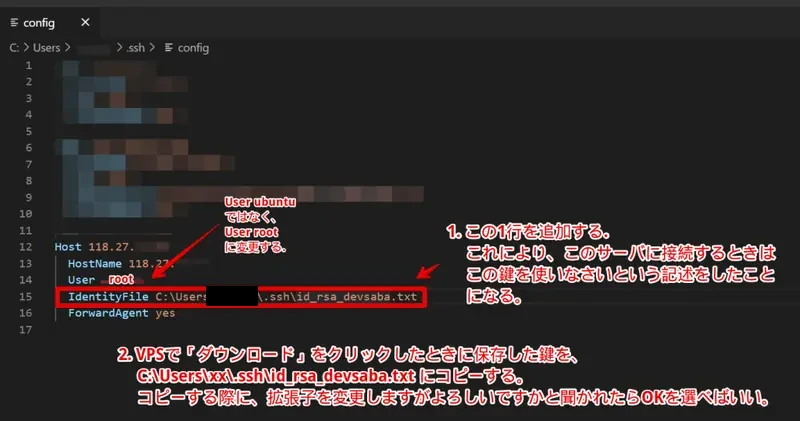
Since the username of the connection destination is root by default,
Change where it says User ubuntu to
User root
Next, add one line: IdentityFile C:\Users\xxx\.ssh\id_rsa_devsaba.txt.
This tells it to use this key when connecting to this server.
Since the file is not yet placed in this path, copy the saved key (file with .pem extension) when clicking "Download" on VPS to C:\Users\xx\.ssh\id_rsa_devsaba.txt.
If asked if it is okay to change the extension when copying, choose OK.
Don't forget to press Ctrl+S to save the file.
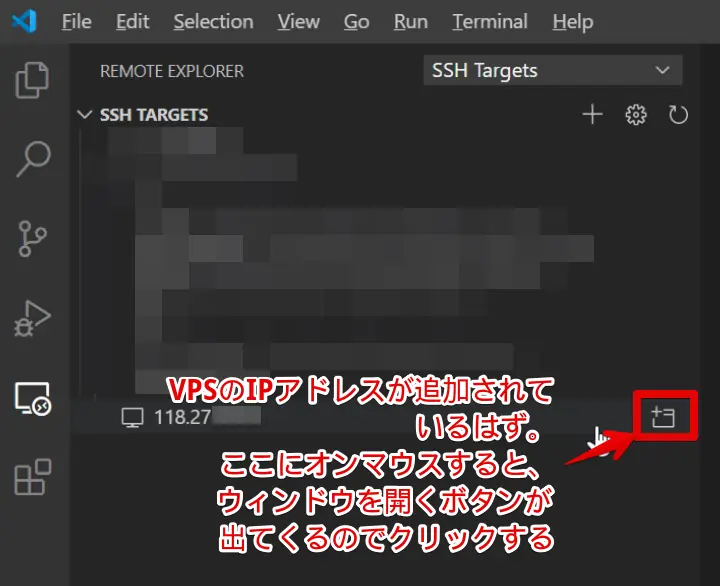
With this, the IP address of the VPS should have been added. When you mouse over (hover) the place where the IP address is displayed, a button to open a window appears, so click this.
After a while, you will be asked if the VPS is Linux or Windows, so choose Linux.
If asked Continue?, choose Continue.
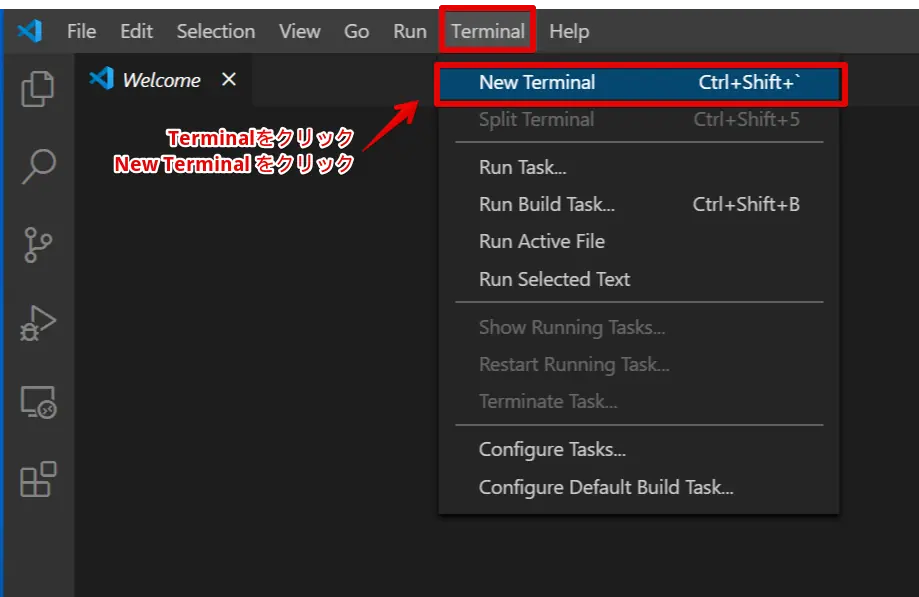
After a while, the VS Code screen will be displayed, so press Terminal -> New Terminal.
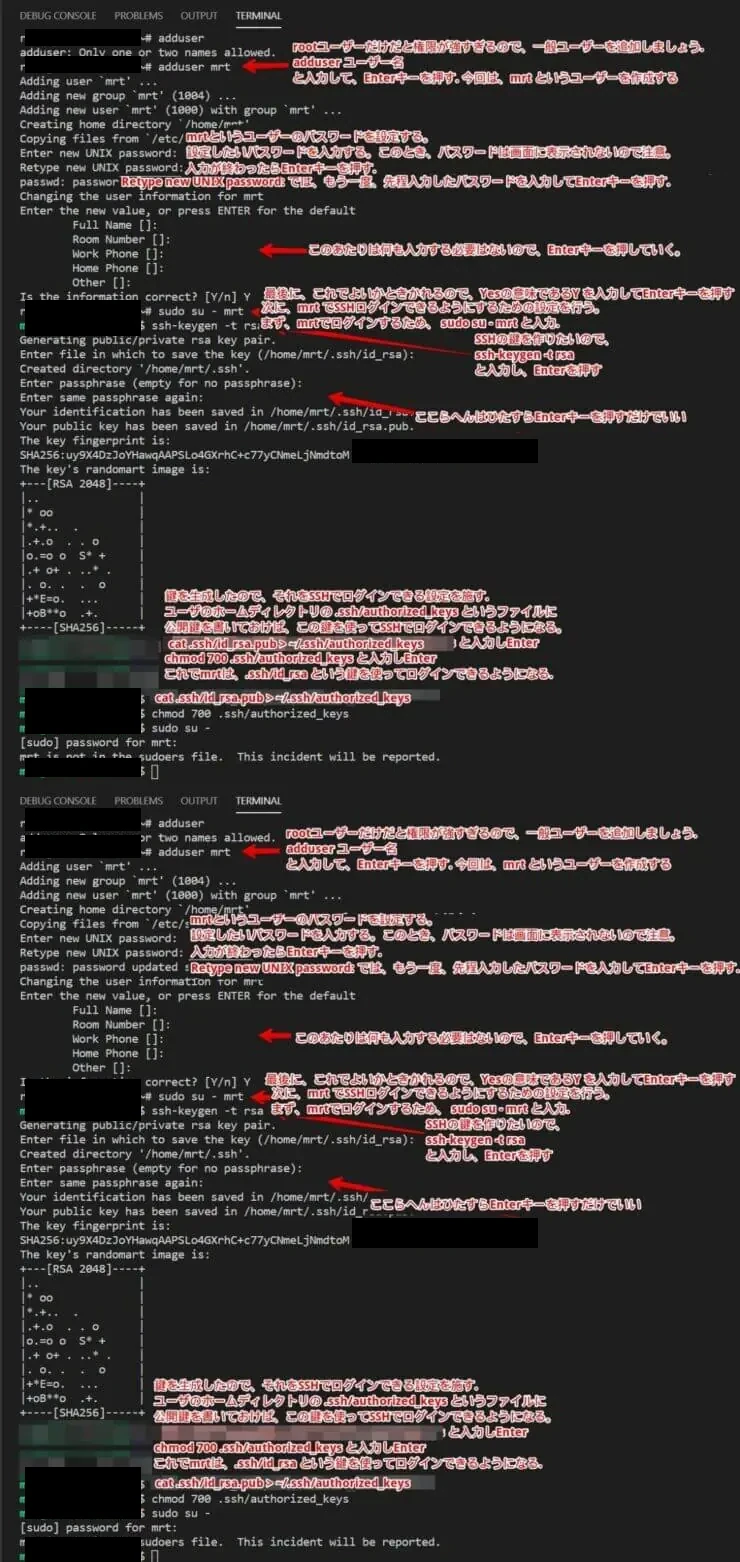
The next thing to do is to add a general user. Please follow the screen above.
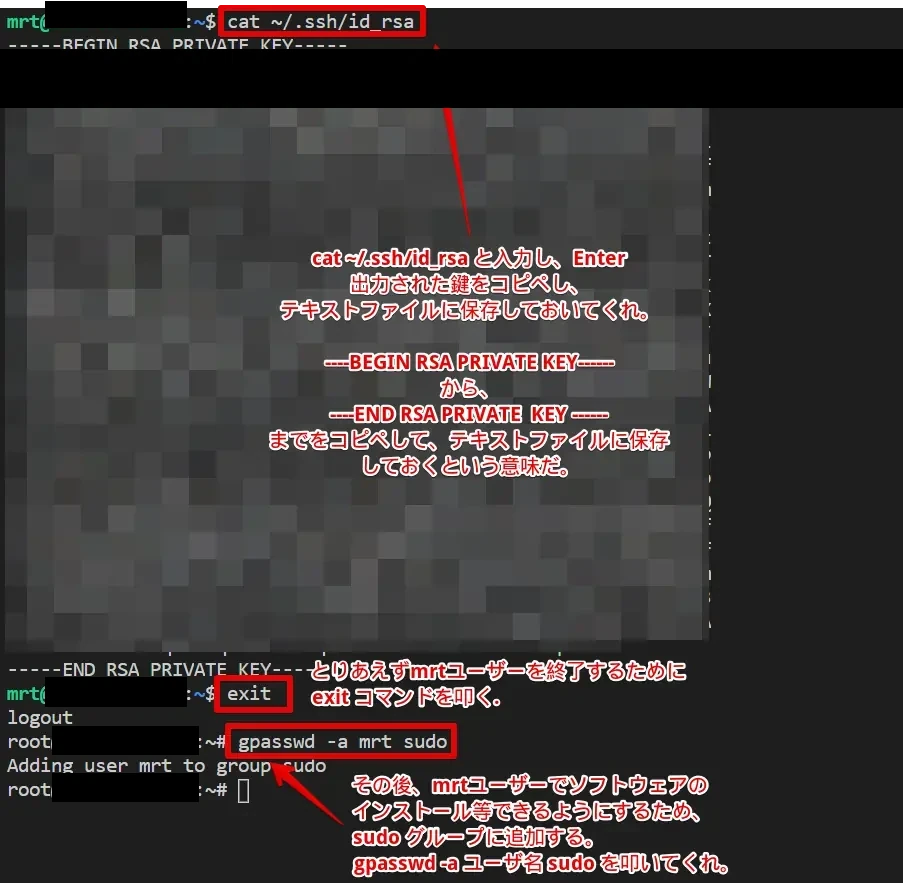
Also follow the screen above for this.
Up to here, a general user has been added to the VPS.
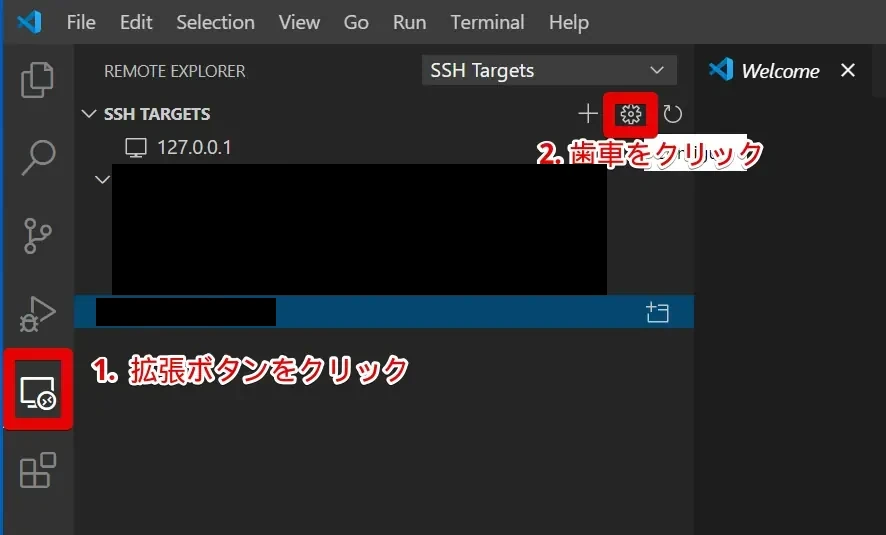
From here, we will make it possible to log in with a general user with Remote Development of VS Code.
Click the Remote button and click the gear.
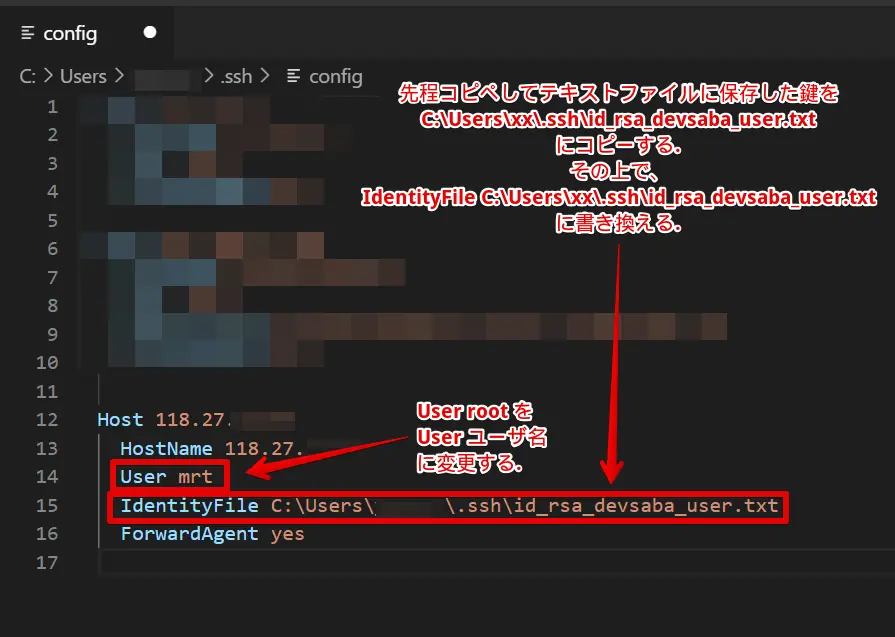
Please follow the screen above.
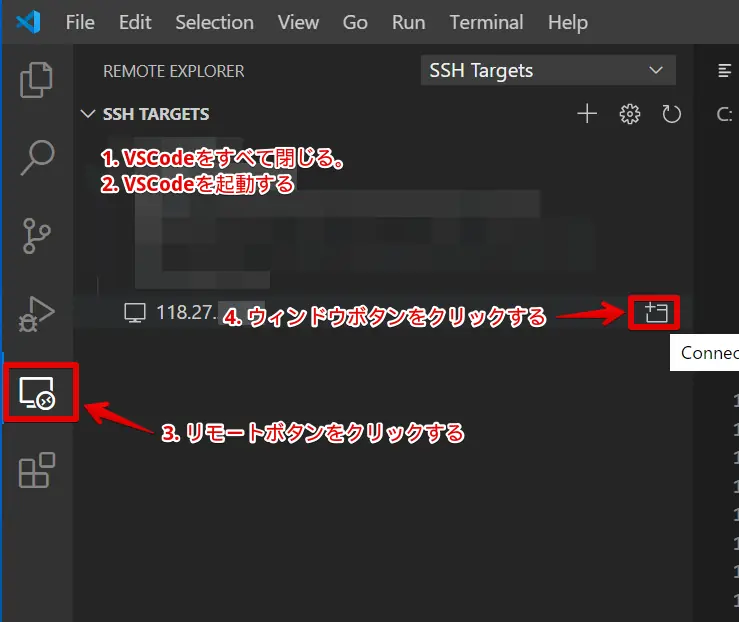
Close all VS Code and restart VS Code.
Click the Remote button and click the Window button,
Congratulations, the remote development environment with ConoHa VPS + VS Code as in the title is ready!!!
Just write programs on VPS
After that, just use VS Code as usual.
Since you can hit commands on the VPS in the Terminal,
you can do sudo apt-get update,
sudo apt-get install ruby,
and hit ruby -e 'puts "Hello World!"'
to run Ruby.
With this, we were able to unify the remote development environment with ConoHa VPS + VSCode.
Good job!